Broadband HamNet (BBHN, formerly known as HSMM-MESH) isn’t really one of my core interests in amateur radio but I am finding it a useful learning exercise putting together a BBHN node and running some services across the resulting ad-hoc IP network so it warrants some notes on this site. Mainly I’m finding it is consolidating and extending my Linux and IP networking experience and I’m learning new things like Python programming.
What is BBHN anyway?
BBHN basically refers to use of modified commercial wireless networking equipment by licenced Radio Amateurs. The commercial equipment is modified by firmware to operate an ad-hoc mesh networking protocol within the 2.4 GHz and 5 GHz Amateur Radio bands. Operating under licenced conditions enables us to use higher transmit powers and directional antennas and thus create ad-hoc IP networks that work over long ranges. I won’t dwell on usage here, there’s plenty of that elsewhere on the Web.
What am I doing?
My neighbouring Radio Amateur, G4ELM, is building up a set of BBHN kit and has passed a couple of 2.4 GHz nodes my way: a modified Linksys WRT-54G and a modified Buffalo AirStation. The WRT runs from 12V DC so it seemed like a neat place to start experimenting with a portable node. To aid transportation and storage of this portable node I’ve secured its main components to the lid of a plastic storage box, effectively it’s a portable BBHN test bench for my experimentation.
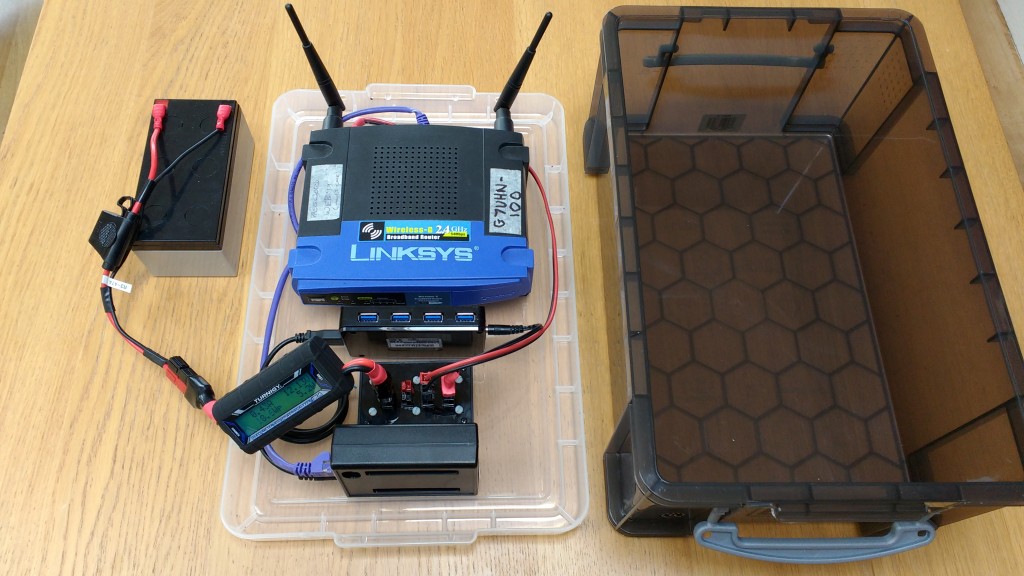
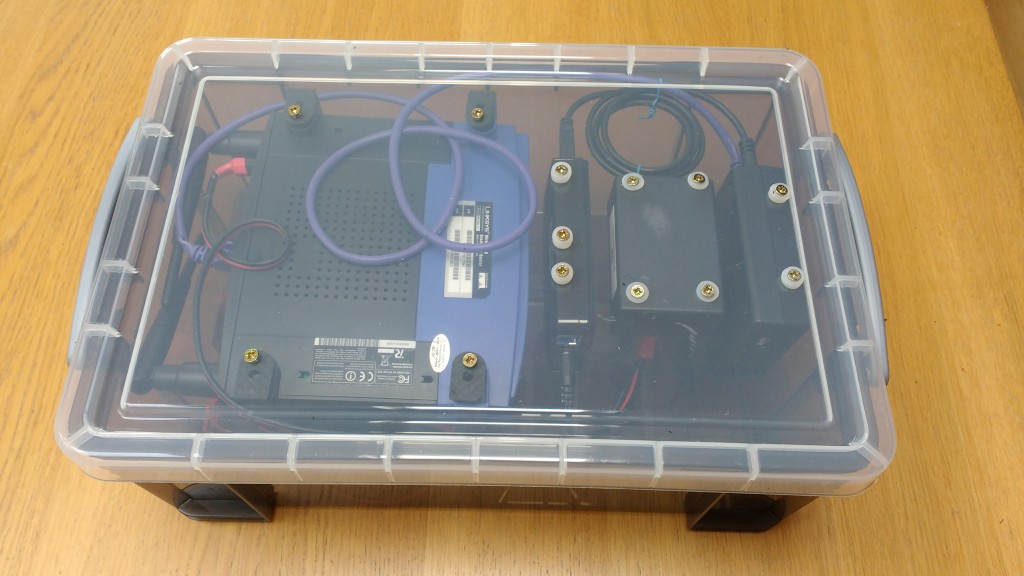
The node’s main components are:
- Linksys WRT-54G modified with BBHN firmware;
- PowerPole DC distribution box from SOTAbeams serves out 12V from a sealed lead-acid battery;
- BeagleBone Black single-board computer;
- Teknet USB hub, powered by 12V and provides a 5V output to power the BeagleBone.
The BeagleBone Black (hostname G7UHN-100-BGL) can run a number of services for the node and provides some independence from the WRT if I want to change it out for different hardware in the future. Some notes below describe how the services have been set up on the BeagleBone Black.
Web server
The BeagleBone Black runs a web server with a couple of simple pages describing the node and its services. To run this, the BeagleBone Black’s default web server needs to be disabled so that you’re not greeted with the BeagleBone setup pages.
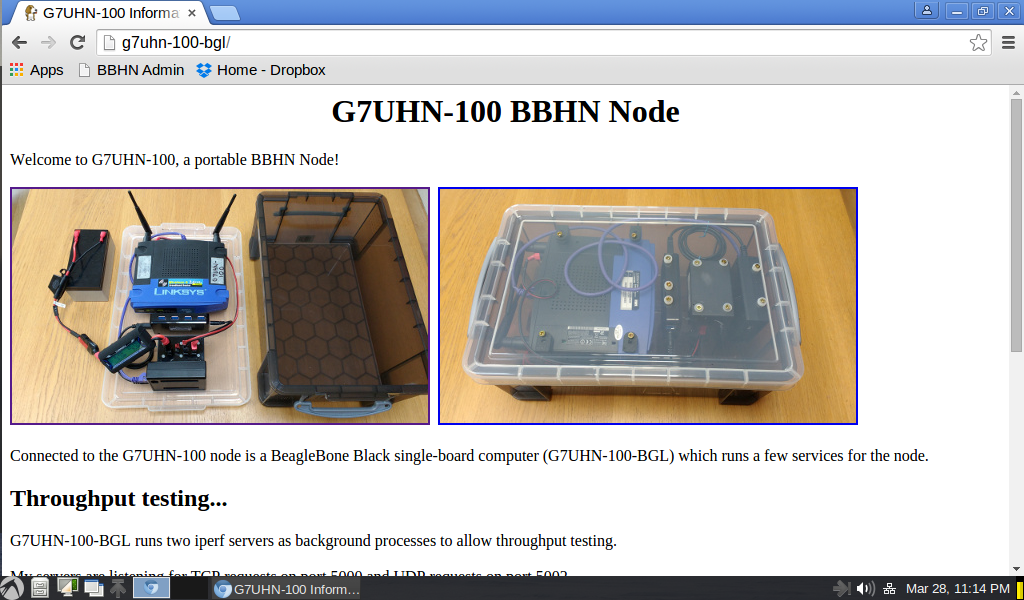
The basic steps to set up are as follows, mainly copied from this helpful page.
- Install Lighttpd – note, this will display a message about the job failing, this is because port 80 is already in use.
- Disable Preloaded Services – the BeagleBone comes with a bunch of preloaded services. This this makes it really easy to get started, but the preloaded services use port 80, and that is exactly the one that we want to use. So, we need to disable them, so that we can run our web server on that port. Also, we disable a few extras in order to free up some memory on the BeagleBone. Here’s how to disable the services (and a link to what the services that you are disabling do, in case you are interested):
systemctl disable cloud9.service
systemctl disable gateone.service
systemctl disable bonescript.service
systemctl disable bonescript.socket
systemctl disable bonescript-autorun.service
systemctl disable avahi-daemon.service
systemctl disable gdm.service
systemctl disable mpd.service - Place the new web pages into /var/www/index.html etc…
I’ve now gone a bit further than this and enabled PHP so that I can do some more fancy stuff on a status page.
sudo apt-get install php5-cgi
sudo lighty-enable-mod fastcgi
sudo lighty-enable-mod fastcgi-php
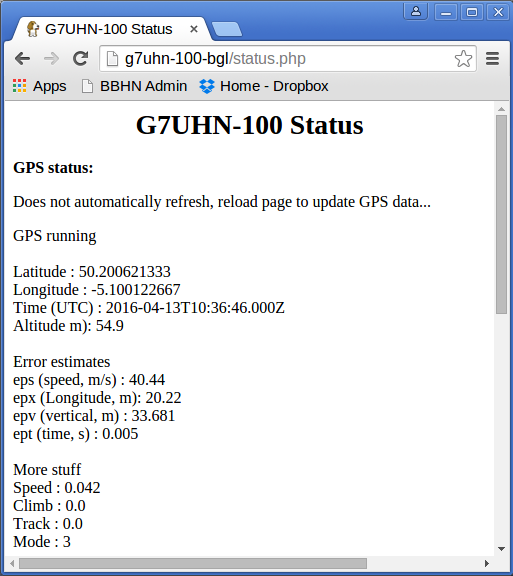
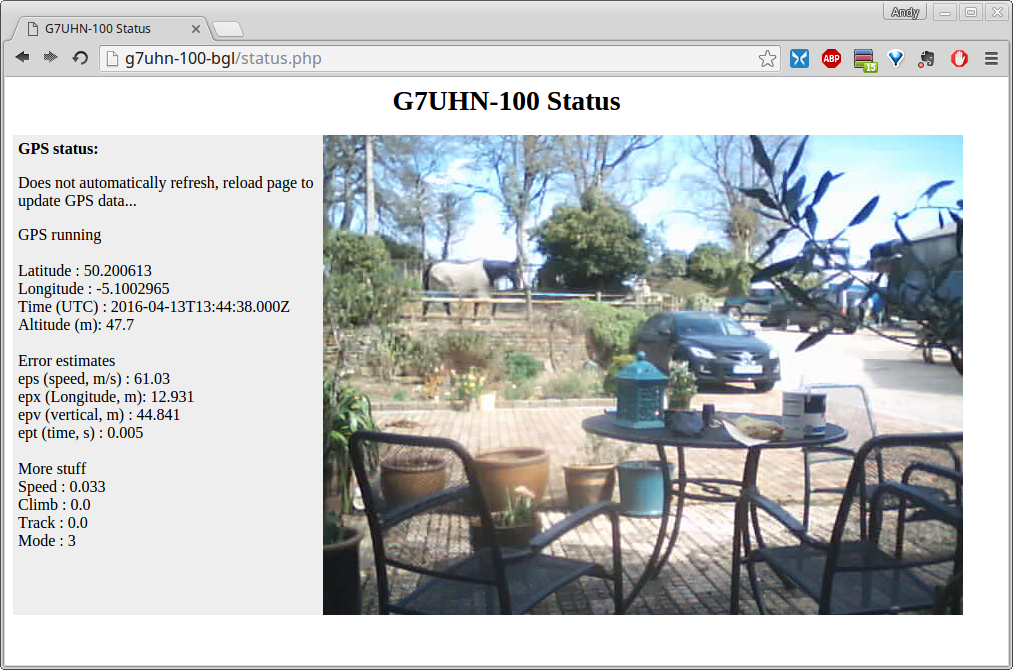
Enabling PHP has allowed me to import the GPS status (see below) into a webpage along with a video stream (again, setup notes below):
Iperf
One of the things that interests me is the throughput performance of BBHN radio links and how that relates to received Signal to Noise Ratio (SNR) – knowledge of this relationship is useful for predicting performance of BBHN links over range when calculating link budgets for this equipment. The BBHN node status pages are very good at displaying received SNR and a “link quality” measure but how can we get a handle on actual network throughput performance? Iperf is one of many network testing tools and I have installed it on the BeagleBone Black to provide a simple means of testing both TCP and UDP performance – this gives us an idea of both the usable bandwidth of a link (through TCP tests) and also the number of dropped packets (through UDP tests)
I’ve created a simple script to run two instances of iperf servers in the background, one listens for TCP requests on port 5000, the other listens for UDP requests on port 5002, the script is located at /usr/bin/startiperf
#!/bin/bash
#This command starts two iperf servers in the background
(iperf -s -p 5000) &> /dev/null & disown -a
(iperf -s -p 5002 -u) &> /dev/null & disown -a
It’s hacky but I’ve added it to the crontab to run at startup as per this page. As root, type:
crontab -e
and make a line:
@reboot /usr/bin/startiperf &>/dev/null &

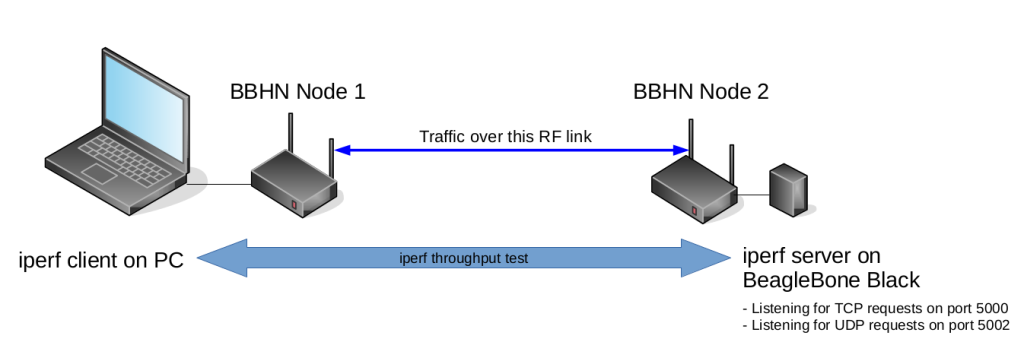
Over at the client side (e.g. a PC with iperf installed connected to another BBHN node in the network) throughput tests can be initiated by commands such as:
iperf -c G7UHN-100-BGL -p 5000
…starts an iperf client, connects to server G7UHN-100-BGL, port 5000, and begins a TCP test from server to client. TCP is the default mode.
iperf -c G7UHN-100-BGL -p 5002 -u
…starts an iperf client, connects to server G7UHN-100-BGL, port 5002, and begins a UDP test from server to client. The -u option switches iperf to UDP mode.
TCP is a protocol that tries to ensure every packet arrives at its destination and thus will attempt to resend data across a link that is losing packets. UDP simply sends data without worrying if it reaches its destination so can be subject to packet loss and the iperf test will report the number of lost packets.
Another way of considering TCP vs. UDP is because TCP gets feedback from the other end of the link it can determine how fast the link can go and thus quickly throttle up or down the transfer speed. So the iperf TCP test will give you a quick indication of how fast a link can be. UDP doesn’t get that feedback so the server can’t know the speed of the link. Think about streaming live video out of a camera. The camera doesn’t know anything about the other end of the link, it just pushes out it’s raw data into a codec, it’s compressed as much as has been determined by settings and the scene content and then that is simply flung out of the machine into the ether… You just have to hope that the link is fast enough to cope. So, the iperf UDP data test throws a predetermined data pattern down the link at a set rate. What you get from that test is a measure of packet loss and jitter. Packet loss is likely to be low until the stream nears the speed of the link or other higher priority traffic interferes.
Both TCP and UDP have their place in the world (e.g. when streaming live audio or video we’d usually rather suffer the occasional audio/video glitch than have the stream develop an increasing delay across the link as dropped packets are resent). Typically you might use TCP tests for measuring bandwidth of the link and UDP for measuring packet loss and jitter.
There are many variables that affect network throughput speeds so you may see different results sometimes and really iperf ought to be restarted at the server between each test for repeatable results – this system doesn’t do that! What it does do is provide me a simple tool to begin investigating how BBHN link throughput varies according to Signal to Noise Ratio.
If this is interesting, you might like to look at other network throughput testing tools such as uperf, ttcp, netperf, bwping, udpmon and tcpmon.
Video streaming
I can start a video server for a USB webcam. At this time my BeagleBone Black doesn’t reliably recognise the USB hub if it’s plugged in on boot so I use a workaround sequence – power up the BBHN node with BeagleBone USB not connected to the hub, give it a short while to boot up, then plug in the USB hub with its devices connected.
Once the USB webcam is connected I use a push button connected to a GPIO pin to start the video server (mjpg_streamer).
I followed this tutorial to install mjpg_streamer. My old webcam (Logitech QuickCam IM/Connect) isn’t a uvc device but whatever driver is on my system seems to work fine. I’ve already got port 8080 in use by my web server so this is the command that I use to start the webcam server on port 8090 instead (run from the mjpg-streamer directory):
./mjpg_streamer -i "./input_uvc.so -f 15 -r 640x480" -o "./output_http.so -w ./www -p 8090"
#!/usr/bin/python

import Adafruit_BBIO.GPIO as GPIO
import os

GPIO.setup("P8_11", GPIO.IN)

while True:
    os.chdir('/root/mjpg-streamer')
    GPIO.wait_for_edge("P8_11", GPIO.RISING)
    os.system('./mjpg_streamer -i "./input_uvc.so -f 15 -r 640x480" -o "./output_http.so -w ./www -p 8090"')
    GPIO.wait_for_edge("P8_11", GPIO.FALLING)
…make the script executable:
chmod +x /usr/local/bin/button-webcam.py
…then, as above, add another hacky line to the crontab to start the python script on boot. As root type crontab -e, add the line:
@reboot /usr/local/bin/button-webcam.py &>/dev/null &
So, at the BBHN node, I power it up, wait a bit, connect the USB hub, wait a bit and then push the button I’ve labelled “Start Webcam”. Then the webcam server starts and the green light on the webcam turns on.
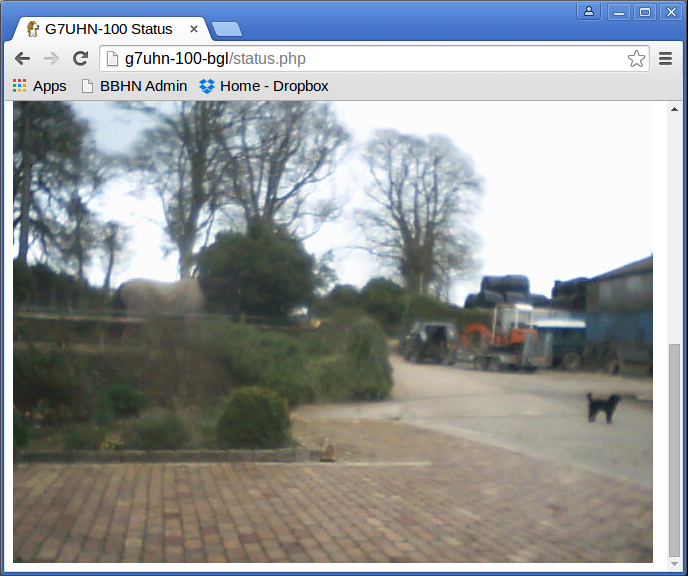
At any client PC on the network, the webcam can be viewed in a web browser at http://g7uhn-100-bgl:8090/stream_simple.html or a range of mjpg_streamer outputs can be viewed at http://g7uhn-100-bgl:8090. The webcam stream can also be added in to any web page as an image using html like:
<img alt="" src="http://G7UHN-100-BGL:8090/?action=stream" height="480" width="640">
GPS
If the G7UHN-100 node is out and about portable it might be useful to know where it is! Getting GPS position into the BeagleBone was remarkably simple – just installing gpsd and gpsd-clients, plugging in a cheap USB GPS ‘mouse’ receiver and running cgps showed the correct GPS information being received on the BeagleBone.
Now, what to do with that information? I’ve taken Dan Mandle’s python script to poll gpsd and tweaked the main python loop to write the data to a file:
<...code extract from /usr/local/bin/gps-file-output.py...>
      while True:

         target = open('/var/www/gps-data', 'w')
         target.truncate()

         target.write('GPS running')
         target.write("\n \n")
         target.write('Latitude : %s \n' % (gpsd.fix.latitude))
         target.write('Longitude : %s \n' % (gpsd.fix.longitude))
         target.write('Time (UTC) : %s \n' % (gpsd.utc))
         target.write('Altitude m): %s \n' % (gpsd.fix.altitude))
         target.write("\n")
         target.write('Error estimates \n')
         target.write('eps (speed, m/s) : %s \n' % (gpsd.fix.eps))
         target.write('epx (Longitude, m): %s \n' % (gpsd.fix.epx))
         target.write('epv (vertical, m) : %s \n' % (gpsd.fix.epv))
         target.write('ept (time, s) : %s \n' % (gpsd.fix.ept))
         target.write("\n")
         target.write('More stuff \n')
         target.write('Speed : %s \n' % (gpsd.fix.speed))
         target.write('Climb : %s \n' % (gpsd.fix.climb))
         target.write('Track : %s \n' % (gpsd.fix.track))
         target.write('Mode : %s \n' % (gpsd.fix.mode))
         target.write('\n')
         target.close()

         time.sleep(2)

<...end extract...>
Copying from the method I’ve already used to start a video server, I make another script to run the gps-file-output.py script upon a GPIO button push (this time using P8 pin 12), /usr/local/bin/button-GPS.py
#!/usr/bin/python

import Adafruit_BBIO.GPIO as GPIO
import os

GPIO.setup("P8_12", GPIO.IN)

while True:
   os.chdir('/home')
   GPIO.wait_for_edge("P8_12", GPIO.RISING)
   os.system('/usr/local/bin/gps-file-output.py &')
   GPIO.wait_for_edge("P8_12", GPIO.FALLING)
…and then add another couple of hacky lines to the crontab to clear out the data file and run the button script on boot:
@reboot cp /var/www/gps-null /var/www/gps-data
@reboot /usr/local/bin/button-GPS.py &>/dev/null &
<?php require_once('gps-data');?>
Audio
I haven’t got any plans to run audio applications across BBHN yet although I’m quite looking forward to the chance to plug in some Cisco VoIP phones and play with an Asterisk-based telephone network…

